Editor Guide
A comprehensive guide to Pite's integrated visual scene editor and code environment.
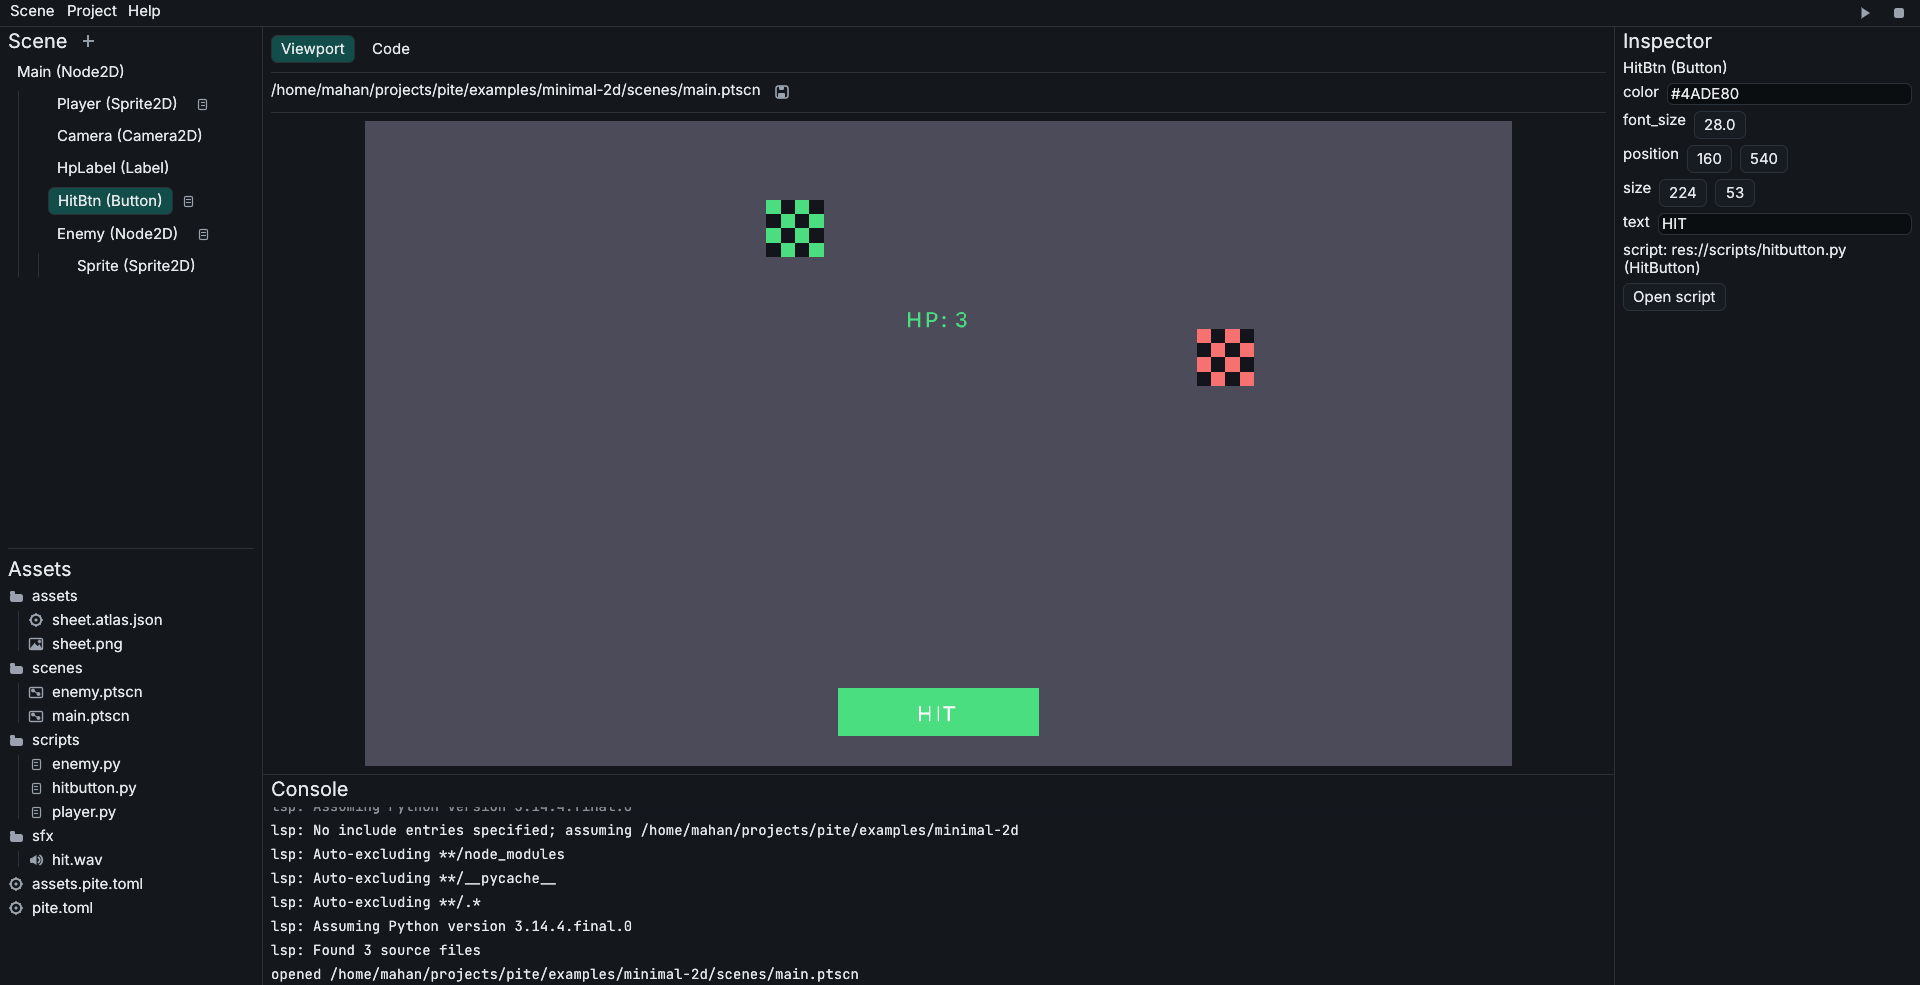
Pite provides an all-in-one desktop editor that combines an interactive scene tree, a real-time GPU viewport, an inspector for node properties, an asset file manager, and an embedded code editor with full Python language server support.
Launch the editor from your terminal by running:
(Or explicitly with pite edit [path/to/scene.ptscn]).
Editor Interface
The workspace is organized into five functional regions:
- Top Bar: Menu bar containing
Scene,Project, andHelpmenus, alongside Play (▶) and Stop (■) buttons. - Viewport (Center): Displays the real-time rendered scene framed at your project's design resolution.
- Code Tab (Center): Built-in code editor for writing Python scripts with syntax highlighting and LSP completion.
- Scene Tree (Top-Left): Hierarchical tree showing all nodes in the active scene.
- Assets Panel (Bottom-Left): Full-featured project file browser and asset manager.
- Inspector (Right): Contextual property inspector with inheritance-grouped properties.
- Console (Bottom): Real-time scrolling output for engine logs, print statements, and error traces.
Viewport and Playtesting
The Viewport renders your game using the same camera and rendering pipeline as the standalone game runner:
- Resolution Scaling: The viewport automatically contain-fits your game's design resolution (configured in
pite.toml) into the available panel space, preserving your aspect ratio with clean letterboxing. - Playtesting: Press the Play (
▶) icon or Ctrl+R / F5 to start gameplay simulation directly in the viewport. Press Stop (■) or Ctrl+R again to halt playback.
Input Forwarding
Keyboard and mouse events are routed to your running scene whenever the cursor is inside the viewport area. Moving the mouse outside the viewport gives priority back to the code editor and global shortcuts.
Scene Tree
The Scene Tree displays the node hierarchy of your current scene, complete with Phosphor icons and color coding per category (2D in blue, physics in teal, UI in green, and timers in gold).
Adding Nodes
Click the + (Add) button in the Scene Tree header or right-click any node and choose Add Child Node… to open the creation dialog:
- Inheritance Tree & Search: Browse the Godot-style inheritance tree or use the instant search bar to find node types quickly.
- Node Descriptions: Selecting a type shows its purpose, inherited capabilities, and typical use cases.
- Placement: The newly created node is automatically inserted directly under the currently selected node (or root), expanding the parent branch.
Node Instantiation
To instantiate another .ptscn scene as a sub-tree:
- Press Ctrl+Shift+A or choose Instantiate Child Scene… from the context menu to pick a scene file.
- Or drag a
.ptscnfile directly from the Assets panel into the Scene Tree.
Reordering and Parenting
The Scene Tree supports drag-and-drop with activation thresholds to prevent accidental drags:
- 3-2 Drop Zones:
- Center band: Drop onto the center of a row to reparent as a child (indicated by a teal bounding box).
- Bottom band: Drop near the bottom edge to insert as a sibling immediately after.
- Top edge (first child): Drop on the top edge of the first child to insert before it.
- Drag Preview Badge: A floating preview card follows the cursor, showing the dragged node's icon, name, and destination target.
Node Management
Right-click any node in the tree or use keyboard shortcuts:
- Duplicate (Ctrl+D): Recursively clones the node, its entire subtree, and all overridden properties.
- Rename (F2): Opens an in-place rename dialog.
- Delete (Del): Removes the node and its children (the root node is protected).
- Move Up / Move Down: Reorders siblings in the tree.
- Attach Script: Choose Attach Script… or drag any
.pyfile from the Assets panel onto the node.
Property Inspector
Selecting any node in the Scene Tree populates the Inspector on the right with an inheritance-grouped layout reflecting the engine's class hierarchy:
▼ CharacterBody2D
    velocity: [0.0, 0.0]
    up_direction: [0.0, -1.0]
▼ Node2D
    position: [640.0, 360.0]
    rotation: 0.0
    scale: [1.0, 1.0]
▼ Node
    name: "Player"
Inheritance Sections and Revert Buttons
- Inheritance Grouping: Properties are organized in collapsible groups corresponding to each ancestor class (e.g.
CharacterBody2Dinherits fromNode2D, which inherits fromNode). - Revert to Default: Overridden properties display a subtle revert button next to their label, allowing you to reset any field back to its engine default with one click.
- Drag-and-Drop Assignment: Drag images (
.png) or atlases (.atlas.json) from the Assets panel directly onto texture and atlas fields in the Inspector.
Editable Property Types
Pite maps engine types directly to interactive controls:
| Property Type | Editor Control | Behavior |
|---|---|---|
Floating point (Num) |
DragValue | Click and drag horizontally to tune; double-click to type |
Integer (Int) |
Integer DragValue | Step values or direct integer entry |
Text (Str) |
Text Edit | Direct single-line string input |
Boolean (Bool) |
Checkbox | Toggle on / off |
Vector (Vec2) |
Dual DragValues | Independent x and y coordinate fields |
Color (Color) |
Swatch + Hex Picker | Color swatch button with alpha popup and hex edit |
Script Attachments
The script attachment section at the bottom displays:
- Path: The
res://path pointing to the script file (always relative to the project root). - Class: The name of the Python class inside the script.
- Open Script: Switches the central panel to the Code tab and loads the attached file.
- Remove Script: Detaches the script from the node.
Assets Panel File Manager
The Assets Panel is a full-featured project file browser:
- Directory Tree: Folders are sorted first alphabetically with empty folders preserved, followed by files alphabetically. Single-click selects an asset with highlight; double-click opens files (or toggles folders).
- Header Actions: Quick + File and + Folder buttons open modal dialogs with starter templates:
- Script (
.py): Generates a starter script inheritingpite.Node. - Scene (
.ptscn): Scaffolds a minimal valid scene with a root node. - Empty File / Folder: Creates a blank item.
- Script (
- Context Menu & Shortcuts:
- Cut (Ctrl+X), Copy (Ctrl+C), Paste (Ctrl+V)
- Duplicate (Ctrl+D)
- Rename (F2): Renames the asset on disk and automatically rewrites references across scenes and scripts via
pite_assets::apply_renames. - Delete (Del): Deletes the item with a confirmation modal.
- Copy Relative Path (
res://…) and Copy Absolute Path - Show in File Manager: Reveals the item in your operating system's native file explorer.
- Drag-and-Drop Ingestion: Drag files or folders directly from your operating system into the Assets panel. Pite copies them to the target directory, applies collision suffixes (
file (1).ext) if needed, and triggers an asset reimport. - Internal Moving: Dragging files or folders onto other directories moves them on disk with cycle protection and automatic reference updates.
- Cross-Panel Dragging: Drag
.pyscripts onto Scene Tree nodes to attach them; drag.pngor.atlas.jsononto Inspector fields to assign properties.
Code Editor and Autocomplete
Clicking any script in the Assets browser or choosing Open Script switches the central view to the Code tab.
Features
- Syntax Highlighting: Colors Python keywords, strings, function definitions, numbers, and comments.
- Error Gutter: Line numbers line the left margin. Lines encountering runtime errors or syntax issues display diagnostic badges with hover tooltips.
- Live Code Reload: Saving a script (Ctrl+S) while the game is playing updates logic in real time via hot reloading.
Language Server (Pyright)
The editor integrates with Pyright using the Language Server Protocol (LSP) to provide intelligent autocomplete and type checking:
When Pyright is available on your system PATH:
- Autocomplete: As you type, suggestions appear in a contextual popup. Press Ctrl+Space to trigger completion anywhere, and Enter to accept.
- Signature Help: Typing an opening parenthesis
(displays function parameters and docstrings. - Type Hover: Press Ctrl+H over any variable or method to view type signatures.
- Engine Stubs: Pite bundles complete type stubs (
pite.pyi), enabling autocompletion for all engine classes, properties, and signals without extra configuration.
Tilemap Editing
When a TileMap2D node is selected in the scene tree:
- Inspector Tilemap Panel:
- Active layer switcher and layer toggles (
visible,collision_enabled). - Tool mode switcher: Brush (paint selected tile) vs Eraser (erase tile).
- Tile palette displaying all named frames in the referenced atlas.
- Active layer switcher and layer toggles (
- Interactive Viewport Painting:
- Hovering over the viewport displays a snapped tile preview rectangle at the grid cell.
- Left-clicking (or dragging) paints the selected tile into the active layer.
- Right-clicking (or dragging) erases tiles.
- Edits automatically update the scene, refresh Rapier static physics colliders, and save the
.ptmapfile.
Save Scene and Code
Pressing Ctrl+S (or Cmd+S on macOS), clicking the save icon button in the header toolbar, or selecting Scene > Save saves both the active .ptscn scene and any open code file (script) at once:
- Scene Serialization: Serializes the live tree (
ops::build_doc→pite_scene::save_scene) and writesscene_path. Success and failure both log to the console; saves never panic and never fail silently. - Instance Preservation: The scene file on disk stays authoritative: save reads it first and re-attaches its
[[instance]]entries instead of flattening them into plain nodes. Prop edits inside an instantiated subtree are written back asoverrides, and edits the format cannot express are refused with a console error rather than silently dropped. Props serialize in sorted order, keeping saves byte-identical. - Live Script Saving & Hot Reload: If a script is open in the Code tab, it is written to disk simultaneously, triggering script hot-reloading in the running session.
Use Scene > Save Scene As… (Ctrl+Shift+S) to clone the active scene to a new file.
Project Settings Dialog
Open Project > Project Settings… to configure project metadata without editing TOML files manually:
- Project Metadata: Edit project
name,author,main_scene, andicon. - Display Resolution: Adjust
window_widthandwindow_height. The viewport updates its aspect framing immediately upon saving. - Export Inclusions: Add non-code files or assets that must be included in exported bundles.
Clicking Save validates the fields and rewrites pite.toml cleanly.
Keyboard Shortcuts
| Shortcut | Action | Scope |
|---|---|---|
| Ctrl+S | Save open scene and script at once | Global |
| Ctrl+Shift+S | Save Scene As… | Global |
| Ctrl+O | Open Scene file | Global |
| Ctrl+N | New Scene | Global |
| Ctrl+R / F5 | Play / Stop simulation | Global |
| Ctrl+Q | Quit Pite Editor | Global |
| Ctrl+D | Duplicate node / Duplicate asset | Scene Tree / Assets Panel |
| F2 | Rename node / Rename asset | Scene Tree / Assets Panel |
| Ctrl+Shift+A | Instantiate Child Scene… | Scene Tree |
| Del | Delete selected node / Delete asset | Scene Tree / Assets Panel |
| Ctrl+X / C / V | Cut / Copy / Paste asset | Assets Panel |
| Ctrl+Space | Force LSP autocomplete popup | Code Tab |
| Ctrl+H | Show type hover info | Code Tab |
| Esc | Dismiss autocomplete popup | Code Tab |